The previous owner of Gimme Shelter converted the icebox to a refrigerator in 1985. I still have the receipt for the Adler-Barbour cold machine. However, after 30 years of service, it had seen better days.

When it finally gave up the ghost we decided to start fresh, so we set about dismantling the system and cleaning out the icebox.
With the modern refrigerator kits from Isotherm and Adler-Barbour, converting an icebox is one of the easiest projects we’ve done.
The very first step when attempting a conversion is to measure your icebox and calculate the volume. Ours was 16″ x 20″ x 21″. With a quick conversion that’s 1.33′ x 1.66′ x 1.75’= 3.88 cubic feet.

Knowing the size of icebox we needed to cool, we started browsing our available options. Based on price and reviews, we decided to try the $899 Isotherm Compact 2301 Icebox Refrigeration Kit. However, there doesn’t seem to be much difference between one brand and another anymore. They all use danfoss compressors, and the evaporators look mysteriously similar.
When the refrigeration kit arrived, the box was surprisingly small.


In the box was the compressor, condenser and evaporator, pre-charged with r134a coolant.


The unit also came with a bracket for mounting the compressor on either a horizontal or vertical surface.

And the kit came with the thermostat, a fuse holder, and a short power cable, but we had to supply our own positive and negative leads to the battery as well as a breaker.

The Isotherm unit turned out to be so compact that it could be easily mounted under the galley cabinets or a settee. However, since we already had a hole drilled and a location available in the lazarette, we decided to keep the new unit there.
That brings me to step two. Figure out where you want to mount the compressor and lay everything out BEFORE you drill any holes in the icebox.

As you can see, we already had a hole drilled, but making sure you drill the hole in the right place is the most complicated part of this entire project. If you’ve got everything laid out and drill your hole in the right spot, you’re over the hump.

For best results, you need to run power wires directly from the battery to a breaker to the mounting location. The instructions for you refrigerator will tell you the appropriate wire and breaker sizes.

Wiring the new Isotherm unit was incredibly easy. Everything is very clearly labeled and uses push-on connectors.

Once we had our wiring and coolant lines run, we screwed down the Isotherm mounting bracket where we wanted the compressor to sit. Then it’s vibration absorbing feet just slide onto the bracket and clip in.

The coolant lines have self-sealing valves. In other words, they don’t open until you screw them together. And if you ever need to take them apart, they should seal themselves as you unscrew them. This not only makes install easy, it’s also much better for the environment not to have coolant leaking into the air.

The lines are threaded with one male and one female on each half of the system, so that there’s only one way to hook them together. Just line them up straight and use two wrenches to tighten them.

Meanwhile back in the icebox we need to mount the evaporator as high as possible while leaving space for an insulated lid. Trying to stick your arm down in the box while screwing at an odd angle can be tricky, so making a paper template of the evaporator and pre-drilling the mounting holes makes it easier. I was really surprised the unit didn’t come with a paper mounting template.

The bare metal end of the thermostat lead needs to be screwed up against the bottom of the evaporator. (I forgot to get a photo of this, but I found out the hard way that it’s much easier to accomplish this before you screw the evaporator onto the wall.)

Our unit also came with a lid that is held in place with a bungee cord. I’m not sure it really does much to make the icebox any icier, but it does give the refrigerator a more finished look.

Our final step was to attach the positive and negative 12-volt leads to the control panel on the compressor. We flipped the breaker and were delighted when the unit hummed to life. However, it was an extremely quiet, barely audible hum. Our old unit had sort of a high-pitched bearing squeal that was audible anywhere in the boat. With the new unit we can’t hear it at all unless we open the lazarette and listen for it.
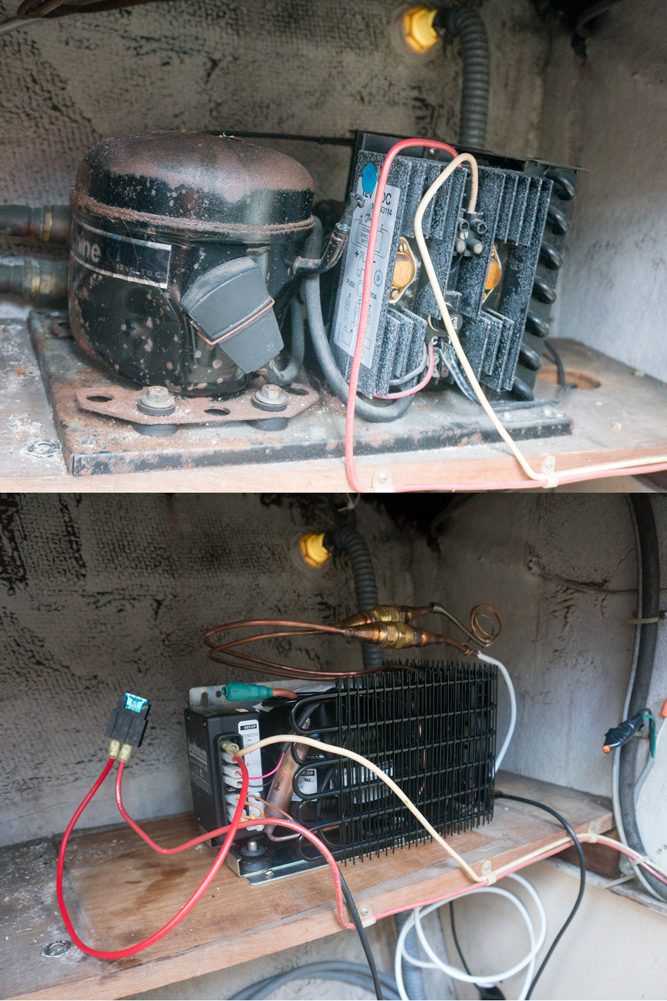
As you can see, the footprint of the new until is less than half that of our old unit.
Once everything is connected and running, you can squirt a little spray foam into the icebox hole to seal it up. If your icebox lid isn’t insulated, it will also boost the efficiency of your new refrigerator to insulate that as well. Catalina Direct actually sells icebox lid insulation containers that just screw on to the bottom of your existing lid in a couple of sizes, but it’s easy enough just to make your own.

