The 1967 Mercury Cougar project came with a 1980s Ford AOD transmission. This conversion is a nice upgrade over the original C4 if you plan to do much highway cruising.

However, the craftmanship of the original conversion left a bit to be desired. The person had used the factory AOD throttle valve (TV) cable, which didn’t really connect correctly to the carburetor. They had also fabricated a cable bracket and spring return that wasn’t holding up too well. I had noticed quite a bit of flex in it, and when I attempted to unbolt it from the intake manifold to investigate, it disintegrated.

The Lokar TV cable kit for AOD conversions came recommended from several different car magazines and forums online, so I decided to give it a shot. I won’t go into detailed instructions for the installation because there are a couple great videos about that already.
However, I will mention a few problems I encountered during the install and my solutions.
The first thing I did was add a Geometry Corrector to the Holley carburetor. While some people said they connected the Lokar cable directly to the carb with no issues, this piece creates an even pull from idle to WOT.

Then I tackled the transmission end of the cable. The shift lever went on with no problem, but the cable bracket was a trick. The Lokar kit comes with a longer bolt to replace the original pan bolt. It goes up through the pan and has a nut that goes on the back of it to support the tension.
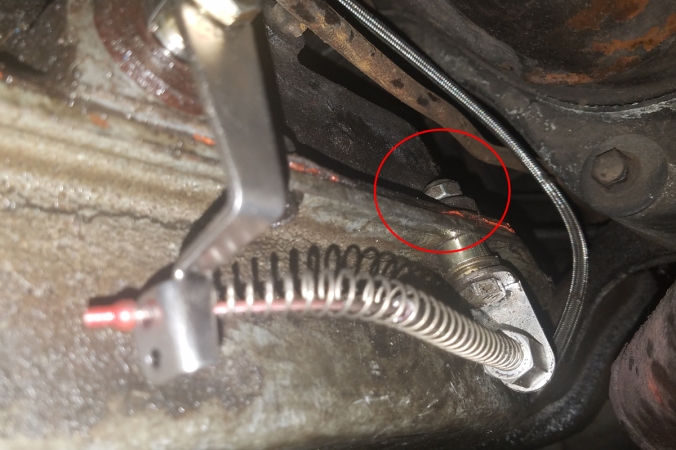
On my car there was not enough space between the hole and the wall of the transmission to get the nut threaded onto the end of the bolt. If I had been doing this project with the transmission on a bench, I might have been able to hammer in the housing a little or bend the lip down a little to create enough clearance, but neither of those things were going to happen in the car. Instead I grabbed the dremel and shaved down the back edge of the nut.

With the flat side against the transmission case, I was just able to get it to thread. That stupid nut was the hardest part of the project.
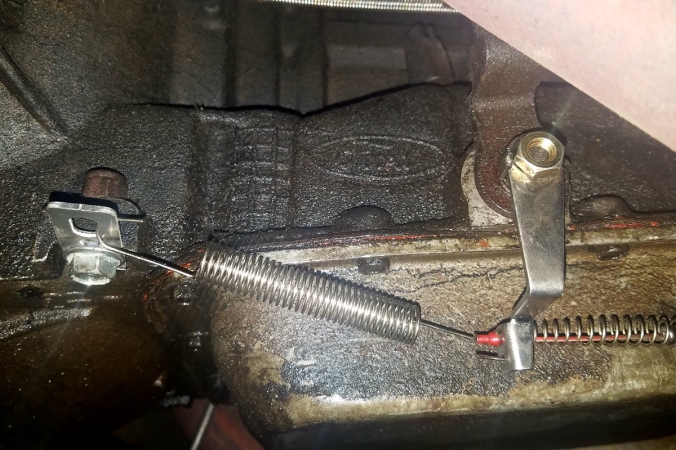
Once I had the transmission end put together, I tackled the spring return bracket on the carburetor.

The Lokar bracket that comes with the kit is really engineered for a throttle cable, so I had to adjust the bracket all the way in towards the carburetor, and it still barely has clearance for the throttle rod. However, the rod has full travel and the bracket isn’t causing any binding, so although I’d like a little more space, it seems ok. In the photo above you can see the Lokar adjuster tool that comes with the kit on the cable between the snap connector and the stop adjuster.
Strange fact, the allen wrench sent in the Lokar cable kit did not actually fit the set screw in the stop adjuster. I had to dig one out of my toolbox. Not sure how Lokar let that issue sneak past QA. Not a big deal, but then again, it’s not much of a confidence builder either.
Once the cable and all the brackets were installed, I screwed the pressure gauge into the TV test port on the passenger side of transmission and started the car up to set the TV cable tension.
With the car in neutral and absolutely no pressure on the cable, I was still getting 40 psi on the gauge. After several google searches and various tests, I finally pressed my finger against the shift lever and found it moved just the slightest bit. The gauge instantly dropped to 0. I let my finger off, and the lever slowly moved back out a few millimeters and the pressure came back up to 30 psi.
I have no idea why the lever wants to move by itself. This was not really discussed anywhere in any of the instructions. However, on some forums people had claimed that the Lokar cable spring wasn’t heavy enough to return their transmission to neutral while others defended it as being great. It definitely wasn’t strong enough for my transmission. I fabricated a little bracket and hung another return spring on the system, and suddenly, all my pressure readings were exactly where they were supposed to be.
I used vice grips to hold tension on the cable and tighten the set screw with the Lokar spacer in place to 35 psi.

Then as soon as I pulled the spacer, the cable would snap back and the pressure would drop to 0 psi.
As soon as I removed the pressure gauge I took it for a test drive, and the shifts were much smoother and not as late as before.
One step closer to being on the road.


Isn’t the cable supposed to be on the bottom hole on the TV arm with the Holley carbs ?
You might be able to make it work that way, but it helps to have that geometry corrector bolted on, so it pulls straight.
Lokar kits are expensive jokes. I bought 3 kits over the years because one thing they do good is the cable + braided sleeve and couldn’t find better alternative for cables.
For my AOD?FMX swap, I have used only bits of theirs “made for AOD” kit. (which turned out to have the exact same bracket as for my “for a C6” kit). Using their stuffs means you have cable hanging, not pulling in line. Also look at the guide and spring that they provide. The lever isn’t pushed back properly because the too weak and too large vs the provided guide spring. I can see that on your picts too. Also the curve you end up with and the lever not fully back on rest is because of that cheap too soft spring. The extra one that you added is fixing that, but should not be necessary. Kickdown cable kits for FMX was even worse. Very bad products, clearly untested that can potentially cost you a trans.
Please let me know if you’re looking for an author for your site. You have some great posts, and I think I would be a good asset. If you ever want to take some of the load off, I’d like to write some material for your blog in exchange for a link back to mine. Please shoot me an email if interested. Thanks.
I too have just installed the lokar linkage on my 91 AOD Transmission for my 72 Mercury Cougar convertible.
I noticed that the spring down at the transmission was not pulling the cable back just a smig short. So I too fabbed a bracket and hooked up a light weight spring to the Lokar bracket also.
My issue is trying to install a pressure gauge to the transmission. There is hardly any room to get at the port to install the gauge hose. I don’t know how much transmission fluid I will loose once I remove the bolt. I don’t want to be under there on my back fighting with trying to screw in the hose while fluid is dumping down on me .
I am not removing my header to do this job.
Any ideas?
I didn’t have much fluid come out while I was attaching the pressure gauge.
I did get a socket (7/16) in there with an extension that swivels just a little. Scary thing as it went too easy. The only problem I had was the rubber hose melted o. The header. I thought I had it cleared from touching but it did and after I had my pressure set to 36 and unscrewed the rubber line from the transmission port. I noticed the melted spot. I hooked up an air to it and it was leaking so I had to cut the line and added a metal 3/16 line. So if it does rest on the headers I’m good.
So after all that I retested and it was 36 with the spacer and 0 when I pulled off the spacer.
The only problem after that was the length of cable left over. I did a Rockie move and cut the excess off. Right away the cable started to unwind. What is a solution for that.? I know I’m good for know but if I ever have to reset the set screw I would be screwed. Can you purchase just the cable? And is there an end that ( should have come with the kit ) you but to be able to shorten the cable?